How to configure SendGrid SMTP in Magento 2?

Transaction Email open rates method can be up to three times higher than any other similar methods especially with application-base Company. Shoppers expect mails regarding event announcements, sale-off offers, new product updates.
But what is SendGrid?

Companies use SendGrid to send Email regardless of their environment. It allows you to send Email over SMTP or HTTP or any other. You can even use one of the company’s official client libraries. You can send your first email and more. It has been built to serve developers.
STMP is the easiest methods that any neophyte can configure himself effortlessly. All you need is collecting those below pieces of data to enter in the SMTP extension for Magento 2, to have the integration operation.
Now let’s learn how to configure SendGrid SMTP in Magento 2.
How to configure SendGrid SMTP in Magento 2
- Step 1: Create a new SendGrid account.
- Step 2: Download and install Magento 2 SMTP extension.
- Step 3: Configure the SMTP extension for Magento 2.
Step 1: Create a new SendGrid account.
- You can sign in a new account at their official website, it’s always welcoming new customers obviously.
- The technical data is taken from their documentation then you need to note them because you will use in the later steps.
- Next you have to change your SMTP username and password to your SendGrid credentials by: Set the server host name to smtp.sendgrid.net
- Use ports 25 or 587 for plain/TLS connections and port 465 for SSL connections

Step 2. Download and install Magento 2 SMTP extension.
- Here in this guide we will use Magemonkeys SMTP extension to configure this setup. It’s free extension so don’t worry there’s no risk to try out this new advanced modules.

Step 3. Configure SMTP extension for Magento 2.
- Back to Magento Admin, make your way from Magemonkeys > SMTP > Configuration. Expand General Configuration, choose Yes to turn Magemonkeys SMTP on

Expand SMTP Configuration Option, complete these following steps
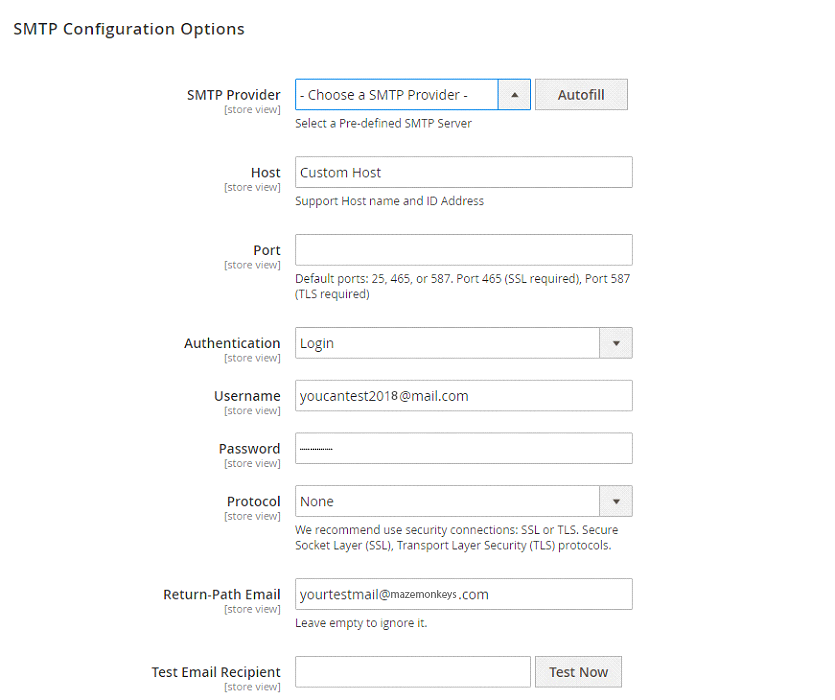
- In the SMTP Provider field, choose SendGrid.
- Click Auto Fill button to fill Host, Port, Authentication and Protocol will be automatically filled up to match SendGrid provider you had chosen.
- In the Username and Password field you have to fill the SendGrid account’s information which you have set up in Step 1.
- In Test Email Recipient, enter the email you want to send to. A successful report will show up if everything worked appropriately.
In this way we setup SMTP in Magento 2 with the SendGrid provider!
Now you go ahead and try this amazing SSMTP service that allows you to deliver your email via company’s serve. Remember your Consumers deserve a better attention.
Fill the form below if you need us to configure your Magento store with SendGrid SMTP.